
Montclair State University websites use the WordPress platform. The introductory guide below provides information on how to log in and use WordPress for those content editors who have already received WordPress and Accessibility training.
This document is also available as a printable PDF. Montclair State WordPress Guide (PDF)
Getting Around With the WordPress Toolbar
Use the My Sites menu to access sites you can edit.

Use the site menu in the toolbar to go from the Dashboard to the website and then back again.


Use the New menu to create a new page or post, or to upload new images or PDF documents.

Use the Edit Page button to edit the page you’re currently viewing

Hover over your username to edit your profile or to log out.

Editing a Page
The WordPress Edit Page interface is broken into two columns.
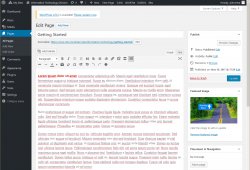
Left Column
- Page Title: This will appear superimposed on the feature image and in the browser’s title bar.
- Permalink: This is the equivalent of the page’s name.
- Add Media: This button will enable you to add images to a page or link to PDF files.
- Page Content: This WYSIWYG editor is where you edit the contents of your page.
Right Column
- Publish Toolbox: Allows you to preview a page, publish, update or even unpublish a page.
- Featured Image: This toolbox allows you to select an image from your media library.
- Placement in Navigation: Allows you to select the page’s parent, which affects the URL.
Publishing vs. Updating
When you create a new page in WordPress, that page is given Draft status by default. Pages in Draft status are available to website editors but not visitors.
When you’re ready to make the page available to the public, press the blue Publish button.
If you’re editing a page that’s already been published, the blue Publish button will be replaced with a blue Update button. Updates to existing pages won’t change their publishing status or publication date.
Editing Menus
When you create a page in WordPress it will not automatically be added to the menu. You must do this manually. To edit the menu, first go to Appearance in the dashboard, then Menus.
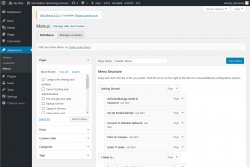
The Edit Menu page is broken into two columns.
Left Column
The left column displays items you can add to the menu.
- Pages: You can find recent pages, view the entire site tree, or search by title.
- Posts: If you want to link to a news article you can search for it under posts.
- Custom Links: This allows you to supply a label and URL to create a link.
- Categories: Links to a category of posts.
- Tags: Links to a collection of posts with the same tags.
Right Column
The right column is for re-ordering and editing menu items.
Drag and drop items to re-order them. Pay attention to the dotted-line box – it will let you know where the item will go when you release it.
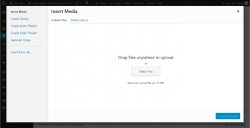
Managing Media
When you upload an image or PDF file in WordPress, it gets placed in the Media Library. You can reach the Media Library from the left menu of your site’s Dashboard.
Adding Images to Pages
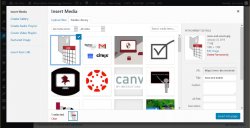
To add an image to a page, start by clicking the Add Media button above the WYSIWYG editor.

You can add an image or a PDF file by uploading a new file or by selecting from your Media Library.
Setting ALT Text
ALT Text is a description of an image that can be read aloud to a visually impaired user. Note: You are required to set appropriate ALT Text for every image on your site.
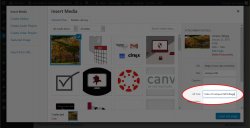
After uploading a file, you can set the ALT Text from the right column of the Media Library.
If you have additional questions about WordPress, please email Digital Communications