For classes in the HawkLIVE or HawkMIX modality, there are a certain number of seats available for students to attend in-person. ITDS has identified a few different options faculty can use in order to allow students to sign up for in-person sessions.
Canvas Calendar/Appointment Groups
Workflow:
Faculty, setting up:
- Go to Calendar on global navigation menu
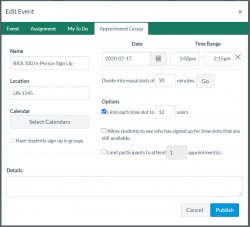
- In month view, click any date to add a new event, then choose the “Appointment Groups” tab
- Give the appointment group a name and location
- Click the “Select Calendars” button to choose the class the appointment group should be scheduled for
- Enter a time range for the appointment group. Only add ONE DATE AND TIME.
- Ignore the “Divide into equal slots of x minutes” section
- Select the check box for “limit each time slot” and set the max number of occupants
- Click publish
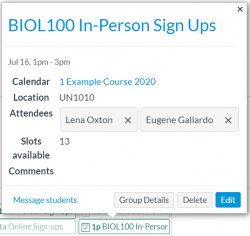
Faculty, editing an existing appointment group:
- Go to Calendar on global nav menu
- Click on the appointment group, then choose “Group Details”
Students, reserving a spot:
- Go to Calendar on global nav menu
- Underneath the mini-calendar on the right, click “Find Appointment”
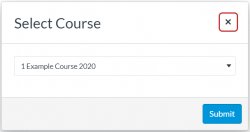
- Choose the class in the dropdown menu that appears (will only show classes that have appointment slots created)
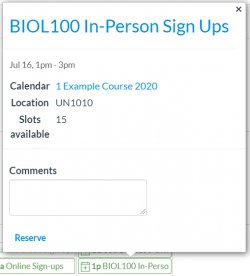
- Click on the appointment slot to see available slots left and reserve a slot (if available)
- Reservation will also show up on Dashboard Card View under “To-Do”
- (If you need to cancel): Visit calendar, click on event, choose “Un-reserve”
Google Sheets
You can make a copy (File > Make a Copy) of our Google Sheet Sign-up Template, then share it via your Canvas course. Instructions are included in the template.
Doodle Poll
- Log into Doodle.com with your MSU Google Account
- Click Create > Group Meeting
- Title your Google Poll (optionally, add a location and description)
- Use the Month option to pick specific dates and times, or use the Text option to label items yourself (i.e., you can create in-person or online options)
- Select the Limit the number of votes per option, then set a number to enforce any class limits
- Click Finish
- Choose the “invite by sharing this link” option to copy and share the Doodle link with your class
Calendly