
Students
Navigate connects you to your support team across campus. Learn how to use this technology to schedule appointments and check in to student services departments!
Features & Tools for Students
- Quickly and easily schedule appointments for academic advising, career
counseling and other support areas. - Check into appointments and access service areas through kiosks around
campus.
- Log into NEST and click on “Academic Advising” then select the Navigate link.
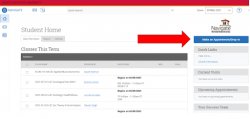
- This will bring you to the Navigate home page and show you classes for the term. In the top right corner, you can select “Make an Appointment / Drop In.”
- Select the type of appointment you need (Academic Advising). Select the service you need (“Advising and Registration” to meet with your assigned advisor, or any of the teacher education-related options, if relevant to you). Select the date you’d like to meet with the advisor from the pop-up calendar.
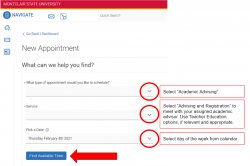
- Select an available time slot. Use the calendar on the right side of the screen to toggle to different dates, if necessary. You can schedule an appointment up to four weeks in advance of the appointment.

- Appointment details are provided for your review. In the comments box, please provide details about what it is you’re seeking assistance with. You are encouraged to check the two boxes at the bottom of the screen to receive an email and text reminder about the appointment. To proceed with the appointment scheduling, click “Schedule.” Shortly after reserving the appointment, you will receive a confirmation in your Montclair State email, which will include all of the details and important information related to your upcoming meeting.

Through Navigate, your instructors can let you know if they have concerns about your academic performance. They do this by completing a “progress report” in Navigate. This will typically happen in the fourth and eighth weeks of the semester, but instructors can raise concerns at any point.
Concerns
When an instructor raises a concern, it is important for you to recognize it and take next steps. This is an opportunity for you to improve. Below are examples of alerts that may be raised, and what you can do to get help.
| Alert / Concern | Description | Next Steps |
|---|---|---|
| Absence | This concern is raised if your absences are impacting your grade or ability to pass the course. | Follow up with your professor, find out what you have missed in class, talk with your advisor about ways you can address your class attendance. |
| Greater Participation Encouraged | This concern is raised if you are not demonstrating engagement in class. | Change your behavior in class: ask questions, participate in discussion, show that you are engaged, follow up with your professor. |
| Missing Assignments | This concern is raised if you have not submitted assignments for class. | Follow up with your professor, visit the Academic Success Center, Follow up with your advisor. |
| Poor Grades | This concern is raised if your grades on assignments, quizzes and test are poor. | Submit your missing assignments, reflect upon why your assignment was missing and create a plan. |
| Tutoring Recommended | This concern is raised when your instructor suggests you seek tutoring for the subject. | Visit the Center for Academic Success & Tutoring to learn more about what type of tutoring is best for you and how to schedule an appointment; you should also follow up with your instructor to determine where you can improve. |
Depending on your college or school affiliation, drop-in advising may not be available all the time. While some offices may be available for drop-in advising regularly, other offices may only serve students by this means during peak advising times, such as during the add/drop period at the beginning of each semester, or during the week registration goes live for the following semester.
- This will bring you to the Navigate home page and show you classes for the term. In the top right corner, you can select “Make an Appointment / Drop In.”
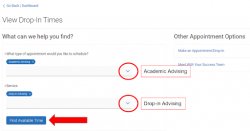
- Select “View Drop-In Times.”

- Select “Academic Advising” as the type of appointment, and “Drop-In Advising” as the Service. Then click “Find Available Times.”
- Select your affiliated college or school.
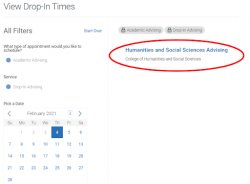
- Included on your college or school’s drop-in page you will find instructions. If the office you’re dropping-in with is seeing students on a first come, first serve basis by the next available advisor, simply click the “Check-in with first available” button. If the office you’re dropping-in with permits checking-in with specific advisors, you will have the ability to select the advisor of your choosing.

- Once you have successfully checked in, you will see the below confirmation. Please take note, wait times will vary and be longer during peak hours. Please be patient and the advisor will be with you as soon as possible. You will receive an email and/or text message with a Zoom link from the advisor when you’re at the top of the queue.
- If for any reason you need to leave your place in the queue to see an advisor, please be sure to remove yourself from the queue by clicking “Check Out” on your Navigate Home screen.
