
Training
Last Modified: Thursday, February 3, 2022 12:16 pm
Navigate has many features that can help create efficiencies while also supporting students effectively. Navigate is a valuable resource, not only for tracking the success of our students and promoting their retention, but also for managing our academic programs and virtual office hours. We’re here to help you learn about these features and teach you how they can be incorporated into your daily administrative operations.
Navigate: Basics Training
This is a 50-min self-guided training, designed for new users without any prior experience using the Navigate platform. Basic Navigate functions are explained including:
- Accessing Navigate
- Your Navigate homepage
- Synching your calendar
- Setting up availability for appointments
- Searching for student records
- Understanding a student’s profile
- Notes
- Appointment Summaries
- Messaging
- Scheduling appointments with other faculty and staff
- Advanced searches
How To Use Navigate
Montclair State University has launched the Navigate platform with the goal of helping students explore a path to timely graduation completion with data, services and supportive connections. Use the drop down drawers to read about questions or how to’s you might need help with while using the platform.
Opening and Choosing Locations
To open the Appointment Center, click “Additional Modes” at the bottom right of the screen and select “Appointment Center.” After clicking the link, you will be taken to a screen to choose a location to schedule an appointment.
Actions from the Student and Appointment Cards
When checking in a student for an appointment or drop-in, users will be able to see additional information and take additional actions from the student card of the selected student.
Available student information:
- Student Photo
- Student ID
- Email Address
- Major
- Classification
- Assigned Staff
- Upcoming Appointments at the location
Actions:
- Send Message to Student
- Edit Upcoming Appointment
- Move Upcoming Appointment to another time slot
- Cancel Upcoming Appointment
- Send Message to Organizer (Advisor or Tutor)
Appointment Summary Reports are primarily created and stored in three main sections of the platform – your staff homepage, a student’s profile page, and the Reporting tab.
Recommended ways to find the Summary Report:
- Locate the magnifying glass on the home page of Navigate.
- Type in the student’s name.
- Click on the Student’s name to pull up their dashboard.
- There is a box on the right of the screen, scroll down and click “Report on Appointment.”
Who should complete the Summary Reports after an advising appointment:
Appointment Summary Reports provide staff and faculty with the ability to document information pertaining to a specific student appointment, whether the appointment was scheduled, a walk-in or the student was a no show.
What to Include in the Advising Appointment Summary Report:
Appointment Summary Reports should only include information related to that specific appointment. Please Note: All notes you include will be accessible to the student, other faculty/staff with administrative access. Additionally, any information you enter into the platform pertaining to a student becomes a part of their official student record and may be subpoenaed by that student, as outlined in the Family Educational Rights and Privacy Act (FERPA).
- Care Unit: Indicates the Care Unit associated with the appointment. This field will be locked if scheduled in advance.
- Location: The location where the appointment occurred. This field will be locked if scheduled through an appointment campaign.
- Service: Indicates the student service associated with the appointment. Only services associated with the selected Location will display as options in your summary report.
- Course: You can associate the appointment with one specific course. The student’s currently enrolled courses will display when selecting this dropdown, but you may search for any course regardless of the student’s enrollment. Please note – the course should populate on the report automatically if the session was scheduled for a course or the student dropped in for a specific course.
- Meeting Type: Indicates if the meeting was on the phone, in-person, or virtual.
- Date of Visit
- Meeting Start/Meeting End: For appointments scheduled in advance, the Meeting Start and End times will default to the scheduled start and end times for the appointment. For walk-in/drop-in appointments, the Meeting Start time will default to the time the summary report is created and End time will default to the time the summary report is saved. You can edit the fields as needed.
- Check-in/Checkout: These fields will default to the times when the student checked in and checked out via Kiosk or Appointment Center. In cases where the student did not check in or check out for the appointment, the fields will remain blank. In cases where the student checked in but did not check out, the Checkout time will default to the time the summary report is saved.
- Attendees: The checkboxes will be checked or not to indicate attendance for each appointment attendee. Not checking the box indicates a no show.
- Summary: Use this field to summarize your interaction with the student.
- Attachments: This allows you to attach a file to the summary report, such as a plan or tutoring schedule. The system will not allow attachments with certain special characters in the title.
- Suggested Follow-up: These fields are used for informational purposes only. No appointment will be created as a result of filling them out.
Creating Appointment Summary Reports
Summary Reports can be created during or after meeting with students. You can add a summary report to an appointment scheduled in advance, create a summary report for a walk-in appointment, mark a student as a no show, or edit existing summary reports.
- For Scheduled Appointments: To add an Appointment Summary for a past scheduled appointment, access your appointments section from your staff home page. On your Staff homepage, under the “Students” tab, scroll down and find your Recent Appointments. From this section, you can click on a student and select “Add Appointment Summary” from the Actions drop down. You can also access this section from the “Upcoming Appointments” tab of the Staff Home.
- You can also add a summary report to an appointment in progress from the Appointment Queues tab of Staff Home. In this tab, the section Students Checked in for Appointments allows you to select a student who has arrived for their scheduled appointment and select Start Appointment from the drop-down menu. This will open the summary report dialogue box in your browser window. If you wish to view other information in the platform while the appointment progresses, you can minimize the dialogue box and return later.
Please Note: It is important to always create Appointment Summary Reports from the scheduled appointment itself, rather than ad-hoc, to ensure the Summary Report is tied to that specific appointment.
- For Walk-in Appointments: There are several different ways to create an ad-hoc Appointment Summary Report for walk-in appointments. Create Appointment Summary is an option in the Actions drop-down menu throughout the platform. The easiest way to create an ad-hoc Appointment Summary Report for a walk-in appointment is from Staff Home or a student profile. Under the Students tab of Staff Home, find the specific student in your My Assigned Students section, or click the drop-down to find the student from one of your saved lists. From this section, you can click on a student and select Create Appointment Summary from the Actions drop down. This will create an Appointment Summary and add that appointment to your calendar in the past.
- No-Show Appointments: The primary way to mark a student as a no-show for a scheduled appointment is from Staff Home. On the Students tab, scroll down and find your Recent Appointments. From this section, you can click on a student and select Mark No-Show from the Actions drop down. You can also access this section from the Upcoming Appointments tab of your homepage. Marking a student as a no-show still adds a Summary Report to the appointment. The only difference is that the box next to the student’s name called Attended will not be checked.
Appointment Summary Reports and Notes are at the core of communication and support. They provide staff and faculty with the ability to record interactions with students pertaining to a specific appointment. The focus is on the student’s overall academic experience. It is important to keep this in mind when deciding on what should be included.
This To Consider
- Visibility: Always write notes and summaries with the understanding that students may be able to access their records at any time. Appointment summaries are always visible to the students and notes have the option to be made visible to students. Either way, all student records are subject to be reviewed or requested by the students.Consider using the visibility feature as a way to foster transparency and openness in the advising relationship. Notes and appointment summaries can help students remember the details of the appointment and advice that they received. It is also beneficial for referrals and communicating what the student has shared in order to help ease the process. Through this open communication, all parties involved are able to be in the loop of the student’s experience and provide consistent service as needed.
- Confidentiality: It is important to be knowledgeable about your role as a mandated reporter within the University. If a student discloses personal information that must be reported, it is vital to let them know what you are obligated to follow University standards for reporting and provide them with the appropriate resources available. No details or confidential information should be included in summary report or notes. It is acceptable to use vague language about “personal challenges” and general referrals. Appointment summary reports and notes are visible to any Navigate user with privileges therefore, details should not be included for confidentiality purposes.
- What will help the next person?: The main goal when writing notes and report summaries is what will help the next person who is providing the student with support. While there are many details involved in a situation, notes should include facts and things that are strictly on a “need to know” basis. Make every effort to be clear, concise and considerate of the student’s situation and privacy.
Best Practices
| Best | Avoid |
|---|---|
Briefly summarize what was discussed as it relates to the student success for future reference.
|
Summarize everything that was discussed. Notes are intended to be brief!
|
Summarize specific course recommendations
|
Report problems with specific instructors
|
Write fact-based academic-related notes
|
Include speculation, subjective opinions or judgements
|
| Spell things out for a general audience | Use acronyms students and other campus support staff may not understand |
Use general or coded language concerning sensitive material
|
Include sensitive information, personal concerns or private matters
|
Record referrals made
|
Report details surrounding sensitive referrals
|
| Include notes about positive student behaviors | Include notes about negative student behaviors |
| Attach important emails | Attach emails with sensitive or private content that the student did not intend for others to see |
In many cases, a front desk staff worker may need to view today’s appointments. With the “Drop-In Appointments” screen, users can view all of the drop-ins for the current day and take action from the list. You can find this screen by clicking the dropdown to the left of the filters at the top part of the screen.
Users are able to add students to a queue from the left hand side. They can add students to either the First Available Queue or a specific staff member’s queue.
Check-In without Specific Staff Button
There is a button beneath the list of staff that says “Check Student in Without Specific Staff”. This button allows front desk workers to check in students to track the duration of a visit (check-in and check-out time) if there are no staff users to check the student in with. This button is recommended only when/if there are no staff available for drop-ins or for when you do not need to check a student in with a staff member. This means that the student’s visit will not be tied to any staff member when accessing appointment reports. Once the student is checked in, users can see that student in their Staff Queue tab on their profile.
Best practices indicate that efficient, effective approaches for advisors to conduct alert triage, or the actual responses to an alert raised, must be clear and well-defined. At the same time, they need not be rigid rules, and your responses will depend on your review of a student’s entire profile.
Alerts currently in use suggest the following responses when opening a conversation with a student.
| Alert Reason | Response Strategy |
|---|---|
| Attendance Concert | Discuss reasons for absences and make a plan for improvement. |
| Greater Participation Encouraged | Review class expectations as indicated on syllabus. |
| Tutoring Recommended | Encourage student to take advantage of academic support (contact information already provided in alert notification). |
| Poor Grades | Discuss academic plan for improvement. |
| Missing Assignments | Discuss academic plan for improvement. |
Getting Started: The alert an instructor sends is already a form of intervention, in that it notifies the student of the and indicates steps the student can take. Not all alerts require your response, but it is important to be prepared for students who may seek your assistance by reviewing the alerts your students may have received. Run an alerts report to see what instructors have said to your students about their progress.
When to Take Action: Use Navigate reports to determine who can benefit from your outreach.
- Multiple Alerts: Sort the alerts report to identify students who have alerts in more than one course.
- GPA: Find students with at-risk for failing alerts who have low GPAs.
- Alert Reasons: Review the records of students with a particular reason for being at risk to fail, such as “Poor Grades.
Closing the Loop: When conducting an advising intervention, it’s important to be timely, and to document the effort. Outreach emails and text messages should be sent through the Navigate platform (“Conversations”). Create Notes or Appointment Summaries of meetings, which will be visible to the instructor.
If an Advisor is using the Navigate platform then they will see a black notification in the top right corner if a student checks in for a drop-in session through the Kiosk. If the tutor navigates to their Home page and selects the Appointment Queues tab then they can set up other modes of notification: Ding, Email and/or Text.
- Students checked in for Appointments: This section will show any students who have checked in for appointments either through the kiosk or with a person at the front desk who is able to check them in through the Appointment Center feature of Navigate.
- Students in My Queue: This section will show any students who have checked in for drop-ins either through the kiosk or with a person at the front desk who is able to check them in through the Appointment Center feature of Navigate.
- Students in other Staff Queues: This section will show any students who have checked in for drop-ins with other members of the location’s staff either through the kiosk or with a person at the front desk who is able to check them in through the Appointment Center feature of Navigate.
Your calendar in Navigate is a quick way to view appointments or events at a glance.
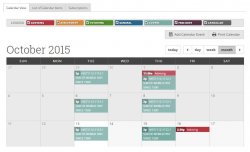
- Add Calendar Event – Clicking Add Calendar Event will bring up your appointment scheduling page.
- Print Calendar – Here you can print your monthly or weekly calendar views directly to PDF.
- View today, day, week or month – Quickly choose to view just Today, or view by day, week or month. Using the left or right arrows allows you to view previous or future dates if desired.
Notice the Legend just above the calendar grid. Options listed include: Advising, Assignment, Tutoring, General, Course, Free Busy and Cancelled. Selecting one of the checkboxes enables associated appointments to show on the calendar grid and deselecting the checkbox hides them. (These options are automatically checked
by default).
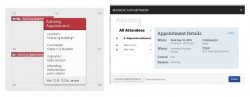
Viewing Calendar Details
A user is able to hover over the calendar detail for a pop-up with more information and can click into the appointment for even further information. From the “Manage Appointment” screen a user would have the ability to edit, cancel, or delete an appointment if they were provided with those permissions by administrators.
Navigate has a variety of reports that a user can run to capture data and to gain insights on student populations, such as advisees. From the left sidebar, select “Reporting” (the page icon with a magnifying glass) to open the menu of options. Reports can be generated on appointments, notes, alerts, progress reports, and cases.
A report is run using the same method as Advanced Search (the larger magnifying glass icon), with the added field to determine which alert, note, or appointment reasons should be included in the report. Be sure to review all sections of the screen to ensure the correct students and parameters are selected.
The report is generated on screen, after which an action can be taken if desired. The action is created collectively, but appears individually to each student selected for the action. Examples are sending a message, inviting students to an appointment campaign, and adding a note. The report can also be exported to Excel for review outside the platform.
Saved Searches allows users to conduct a pre-configured Advanced Search without having to manually and repeatedly create a new Advanced Search. A Saved Search dynamically regenerates a list of students or users based on the search criteria. This feature can be especially helpful for users who frequently run the same search at different points in the term, as it allows you to maintain consistency with your search parameters.
- You can create a Saved Search via the Advanced Search feature. After selecting your search parameters and running the search, click on the “save” button at the top of the screen.
- After clicking “save” you will be asked to name your search. We recommend creating a name that is as specific as possible to help with future queries. Once named, click “save search.”
- It is important to note that the students included on this list will likely change as their data changes. For example, a student switches majors from Finance to Accounting, they will no longer appear on the results list for a saved search that pulls Finance majors. A saved search generates a list of the students that meet your search parameters at this time, it does not save the list of students themselves.
Accessing Your Search
Once you have saved your search, you are able to access the search from several locations within Navigate.
- Home Page – Clicking on My Assigned Students For (Current Term) on your home page will pull up not only lists of your assigned students by term, but also any saved searches or watch lists you have created.
- Lists and Searches – This page within Navigate aggregates all your watch lists and saved searches. From here you also have the ability to create a new saved search by clicking on the ‘New Saved Search’ button, which will direct you to the Advanced Search.
- Advanced Search – You can also access any of your previous saved searches directly from the Advanced Search feature.
Appointment SchedulingUsers with appropriate permissions can schedule appointments by checking the box beside students’ names in various lists throughout the application and by clicking on Schedule Appointment in the Action Menu. These lists are typically found on your home page and in Search areas of the application. The system will then display the Schedule an Appointment page.Appointment Components
- Type is what determines whether the appointment you are creating is an Advising, Tutor, or General appointment. While both Advisor and Tutor appointments are fairly self-explanatory, a General appointment may not be. A General appointment can be considered an obligatory event for the student. Events that can qualify are things like Football practice, Honors Society Dinner etc. The reason adding this type of event to a student’s calendar is important is because those events will then show up as “Conflicts” when scheduling future appointments. It is usually a best practice to only worry about those General events when they occur during the regular school day or office hours.
- Reasons is where you will select the purpose of the appointment. For example, Career Counseling and Schedule Changes can be valid reasons for advising appointments. For Advising and Tutoring appointments, reasons are configured by your Campus Administrators. For general events, the reasons field is open.
- Comments is a section where extra commentary can be entered about the appointment. These comments are seen by both the student(s) and the advisor when they look at their calendar and receive their appointment notification email.
- Select a Date really means select a week in which you would like to schedule the appointment. This lets users see the entire week, and not just a single day, to determine what the best day is to schedule the appointment.
- Location is where you will meet your students. Select the appropriate location from the drop down list.
- Reminders are sent the day-of the appointment. The email reminder is sent the morning of the appointment and the text message reminder is set “x” number of minutes before the appointment. “X” number of minutes is actually defined on the Admin tab by your Campus Administrator. You can mouse over the “?” mark, besides the text reminder, to see what the current value of “X” is.
- Add an Attendee lets the advisor add extra users without having to exit the schedule appointment page. Simply type in the user’s name, select them, and they will be added to the appointment.
- People Attending are the users who will be scheduled for this appointment. The user scheduling the appointment is able to Remove or Add an Attendee prior to saving the appointment.
- Select an Advisor is the list of advisors who have availability at the selected Location. Since you are creating an appointment for yourself, simply check your name.
- Length refers to the length of the appointment. While it will default to whatever the advisor had setup in the availability, it can be overridden here.
- The Scheduling Grid is where you will actually select what time this appointment will take place. You will notice that a checkbox will appear for any times that are available for scheduling. If something is already scheduled or “Conflicts” with that time, you will see that notated on the grid. For example, Appointments, Free Busy, Conflicts (such as a student’s class), or in some cases Drop in’s for walk in appointment times. A blank means the selected advisor does not have availability for that time on that day. You can click on the word Conflicts or Appointment to see who has a scheduling conflict
- Availabilities is where you can override everything and schedule the appointment at any time at any day. Select the option ‘Ignore Availabilities, unlock the calendar’ and you will see checkboxes appear in every field in the grid. Selecting this option allows you to override any conflict or non-available day to
schedule the appointment exactly where and when you want it. - Repeat This Appointment? Is where you can make this appointment recurring. While there are many options to choose, the most common and easiest to use is ‘Weekly’. Select Which Days, Every how many weeks and Repeat Until to make this appointment repeat.
To finish, click the Save Appointment button. When the appointment is saved, the system will send appointment notification emails to each of the attendees with the details of the appointment. It will also update each attendee’s calendar.
The calendar interface shows available time for appointments as white blocks and unavailable times as grey blocks. Blue blocks along the side indicate available drop-in times. If you click the “Staff” icon on the right side of the screen, you will be able to change the orientation of the staff and times if you would prefer one to be the column header over the other.It is possible to filter who appears on the grid by using the Scheduling Grid dropdown filter. There is also a filter for the specific services/courses that the location offers and has staff available for so that if a student is seeking someone for a particular reason this can be narrowed in on within the Scheduling Grid.
Once you select an appointment slot, a pop-up window will open letting you set the details of the appointment. If the name of the student was selected at the top of the Appointment Center, then this dialogue box would display the student’s name. If the service was selected when filtering the Scheduling Grid then it will auto-fill in the dialogue box, but if not then the scheduler will need to select the reason for the appointment.
The option to Edit Details will allow more flexibility around the time of the appointment, if it should start at a time within the 15 minute ranges or be for a duration other than 30 minutes. This also expands the Comments box to allow the scheduler to provide any input the student has shared regarding the purpose of the appointment. Additional options appear to check in the student and send email or text reminders.
Add Time
- Step 1: Click the Add Time button in the Actions Menu/
- Step 2: Select the days and times when you are available to meet with students.
- Step 3: Select whether you will meet with students via appointments or drop-ins during that time. The campaign option is availability reserved specifically as dedicated time for targeted students to make appointments with you.
- Step 4: Choose the location where you will be available.
- Step 5: Lastly, you must select the following services:
- Am I on track to graduate?
- I have a personal and/or academic concern.
- I need help with my course schedule.
- I want to change my major/minor or explore a major/minor, and other.
- Please Note: If your area also helps with co-op/internships select: I need career, co-op or internship help.
- Step 6: Click the Save button. Repeat this process until all of your availabilities have been defined.
- Please Note: You can have as much availability as needed.
Other Options When Adding Times AvailableCopy TimeTo copy a time, select the time you would like to copy and then click the Copy Time button. The availabilities will be copied and a dialog will open allowing you to make edits or to save your newly created availability.Delete Time
- To delete your time, simply select the time and click the Delete Time button.
Please Note: Inactive availabilities are highlighted in red in the Times Available grid.Tips
- Use the Special Instructions box under “Add Availability” to include personalized
information, such as your office room number and location. - You are now able to create availability for group appointments by indicating how many students are able to schedule into the same appointment.
Syncing your calendar to the Navigate platform will allow appointments to flow between your Navigate calendar and professional calendar, blocking off that time and preventing double booking. Remember: only sync your calendar in your live platform, not your training platform, to avoid issues and confusion. And only sync one professional calendar to Navigate.To set up your calendar syncing, click the calendar icon in the left-hand navigation bar. Then click the Settings and Sync button.
- Go into the Calendar Settings page. Click Google Calendar from the list.
- You will be directed to the Google sign-in page.
- Enter your email and password to complete the sync setup.
- Once the sync is complete, you will be taken back to the main Calendar Settings page with information about their sync on display.
Other Calendars: Finally, for those using other methods, click Other Applications on the Calendar Settings page. A page with iCal and WebDav URLs will show that can be inserted into the calendar application. These resources are necessary. Users will need to know how to use them with their calendar application for them to work.For all other calendars (Outlook, Office 365, etc.) please use the help feature in Navigate.
A front desk staff worker may need to view today’s appointments. With the “Scheduled Appointments” tab in Appointment Center, users can view all of the appointments for the current day and take action from the list.Actions include:
- Send message to Attendee (Student)
- Send message to organizer(s)
- View Appointment Details
- Check In (only for Upcoming Appointments)
- Check Out (only for Upcoming and In Progress Appointments)
- Mark No-Show (only for Upcoming Appointments)
- Cancel Appointments
When choosing multiple appointments, actions are limited to sending messages and canceling appointments. This gives users the ability to cancel all appointments for a given day in a particular location.Users also have the ability to select any date and see appointments on the selected day.