What is Google Sites?
Google Sites is a free web application for creating websites. You can develop the website by yourself or collaborate with others to create the content of the pages. You can decide the level of sharing you would like to permit, who the owners of the website are, and to whom you’d like to give permission to edit or revise the site. You can also provide permission to visitors for viewing purposes only.
Why Use Google Sites?
- It’s free and it’s easy to create. You don’t need to know any web coding.
- You can collaborate with other users or create the website solely.
- It is integrated with other Google Apps and tools so you can easily share video, photos, presentations, or calendars.
- Your site is stored on Google’s servers.
- 100 MB of free online storage.
- Faculty and students can use Google Sites to create a professional ePortfolio.
Many instructors utilize Google Sites for the creation of ePortfolio assignments, though a site can be used for the purposes of blogging or other tasks as well.
What is an ePortfolio?
- A collection of digital files (artifacts) that are shared electronically for the purpose of reflection, comment, and evaluation.
- It’s quite simply a website that enables users to collate digital evidence of their learning.
- ePortfolios contain a wide range of digital files, including but not limited to, text or PDF documents, videos, sound files, images, and links to other websites or online resources.
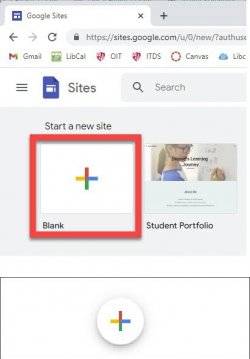
- Go to sites.google.com
- Enter your Montclair email address without mail, e.g. NetID@montclair.edu and password
- Click Sign in
- Click the + Create New Site button
- Enter site name: When you create a new site, enter a unique name. The site name appears in the header in the web or mobile window title bar after you publish the
- Enter your page title: Each page in your site has a title, which appears at the top of the page. The page title also appears in the navigation

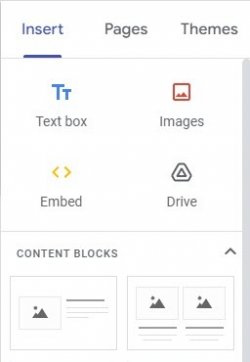
The page editor screen allows you to add/change content to your page. On the right, click on Insert, or double-click on the page where you want to add the content. You can add text, images, URL links and anything from google docs. Choose the content you want to add.
Accessibility Tips:
Check text size and alignment: To make your site easy to read, use large, left-aligned text when possible. Justified text is more difficult to read because of extra space between the words.
Use text to support formatting: It’s best not to rely on visual formatting alone to communicate meaning. Screen readers might not announce formatting changes, such as boldface or highlighting. For example, to mark an important section of text, add the word “Important.” Use numbered and bulleted lists:
Use headings to organize your site: Headings are formatted with built-in heading styles, not changed through font size and formatting. Levels of heading are accurate and should not be skipped.
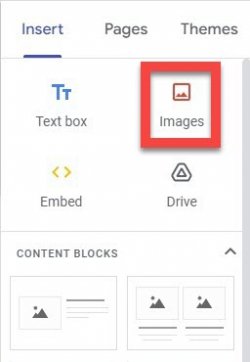
To Insert an Image:
- Click on Insert
- Select Images
- Select image by URL or from your albums or from Google
Accessibility Tips:
Use alternative text (alt text) for images, drawings, and other graphics so that everyone can understand your site. Without alt text, screen reader users just hear “image.”
To Insert a Link:
- Highlight the text you want to become a link
- Select the icon Insert Link
- Enter the URL address
- Click Apply

Accessibility Tips:
Use descriptive links: Screen readers can scan for links, so descriptive link text is helpful. It’s best to use the title of the page as the linked text. For example, if you’re linking to your profile page, the link text should say “my profile,” not “click here” or the full URL.
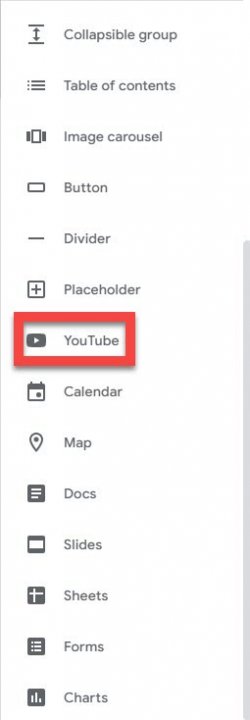
To Insert a Video:
- Click on Insert
- Click on Google Embeds > YouTube
- Type in the search field to find the video
- Select the video
Accessibility Tips:
Captioning: Make sure that your video is captioned or, if appropriate, provide a transcript.
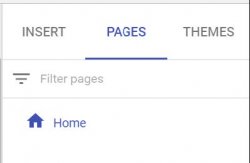
- Click Pages in the top right corner
- Click the + Page button
- Enter a name for the page under Name
- Click Done
- Under Pages, select a page and click on More (3 dots)
- Set it as the homepage
- Rename the page
- Create a sub-page

You can select the background image. Each theme comes with a preset background, color scheme, and font selection. You can adjust fonts, colors, and the background.
Change the background image
- Go to the site and hover your mouse over the background image and click change image
- Select an image from the Gallery or choose another image to upload
Change the header type
- Hover your mouse over the background image and click Header type
- Choose an option
- Large banner
- Banner
- Title only
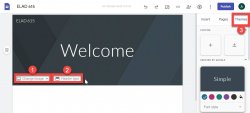
Change the theme and font style
- In the top right corner, click Themes
- Select a theme option and choose a color
- Click Font style and select a style
Accessibility Tips:
Check for high color contrast: High color contrast makes text and images easier to read and comprehend. Web Content Accessibility Guidelines (WCAG) 2.0 recommend a minimum ratio of 4.5:1 for large text and 7:1 for other text and images. For example, avoid light gray text on a white background. To check contrast, use the WebAIM contrast checker.

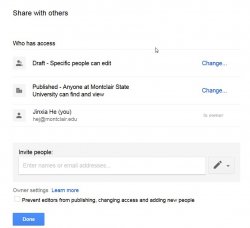
- To share a site from Sites, click on Add editors
- To set permissions across the University, click Change next to Published – Anyone at Montclair State University can find and view, select that option and click Save.
- To share with individuals, enter their email address under Invite
- To change their level of access to your site, click on Change
- Choose the level of access you wish to share. (Anyone you set to Can view can look at the site. Anyone you set to Can edit can change the look and content of the
- To share with specific people, enter email address of the people you want to
- Click Done